*** Update – A new version of this post using Pi5 can be found here ***
If you’re building applications using Docker and shipping them to Kubernetes, it can be difficult and expensive to build a reliable testing environment. The Raspberry Pi team recently released support for booting from Solid State Drives, and a few products have popped up to support this. SSD’s provide a significant performance increase and are far less likely to experience data loss than the former Micro SD card solution. When you combine the support for SSD with the quad core processor and 8 Gb Ram of the Raspberry Pi 4b, it starts to look like a pretty decent option for building cheap Kubernetes clusters. We’ll use MicroK8s to create the Kubernetes instance, Microk8s works well for this project because it is optimized for small devices and provides more functionality out-of-box due to being more opinionated about the platform configuration.
A few benefits:
- Capacity can be extended by adding more Pi’s to the cluster.
- Provides a fixed cost alternative to cloud resources
- Can be integrated into a testing pipeline
- Provides isolation which can improve privacy for testing or experimenting with sensitive projects
To build the cluster, we’ll need a few supplies:
(Amazon Affiliate Links Below)
- Raspberry Pi 4 – 8gb
- SSD Pi Hat
- Short USB cable (A to Micro)
- M.2 SSD Drive – 512 GB
- Micro SD card
- Raspberry Pi Cluster Case
- USB Power Hub
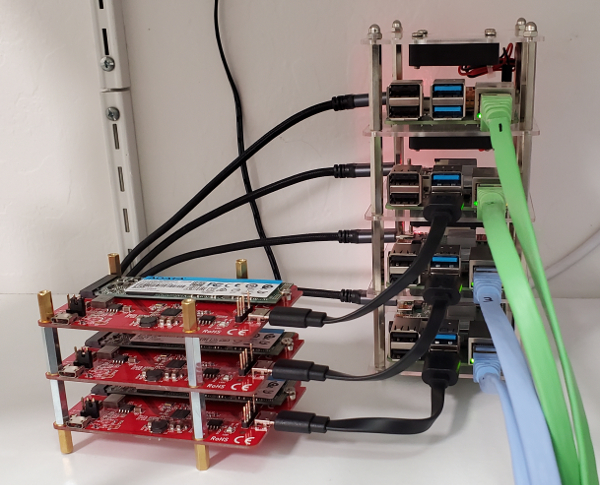
You can have as few as 1 server, or a virtually unlimited number of servers in your microk8s cluster. For this walkthrough I’m connecting 3 servers using identical parts for consistency and redundancy.
Physical Cluster Buildout
There are many ways to physically configure the cluster, so feel free to be creative! I chose to stack the SSD Hat boards together in one stack, and the Raspberry Pi’s in another.
To get started, connect the SSD drive to the Hat board by using the adjustable post and screw. The SSD drive should sit flat on the board and be secured by the screw. After the drives are installed, you can arrange the drives in a stack using the included mounting posts. I added copper cap posts on there as a protective buffer, but you can use the included posts and screws as well. You’ll need to ensure that the drive/board combo has adequate airflow during operation.
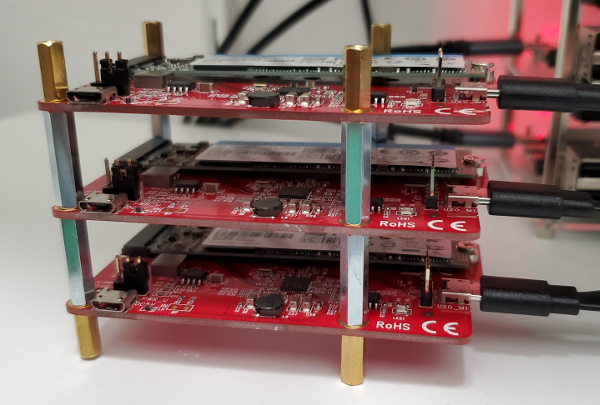
Now you can do the same for the Pi devices. Arrange them into a stack and connect each SSD to it’s respective Pi device using the USB cables. Connect ethernet cables but leave power disconnected. We’ll do that in the next step.
Update the Raspberry Pi 4b Firmware
We will need to update the Pi firmware in order to support booting from SSD for a 64 bit OS. To do this we need to boot from Raspberry Pi OS in order to utilize the tools necessary to perform an upgrade. You can download a copy here, download the lite version. Write the image to your MicroSD card to create a bootable disk, and insert the card into the Pi card slot. Next, boot up the Pi 4’s and wait until you see the terminal login prompt. Login with the default credentials (user=pi and pass=raspberry), and run the following commands to update the Pi’s firmware:
sudo apt-get update
sudo apt-get upgrade -y
sudo rpi-update
sudo rpi-eeprom-update
sudo reboot
After the device reboots, open raspi-config with sudo raspi-config and navigate to Advanced Option > Bootloader Version and select “Latest”. On the subsequent prompt, select “No” to keep your change (and not reset default values). Careful with this part, as it is a counter-intutive experience.
Install Ubuntu OS
We’re ready to install Ubuntu now that the firmware has been updated. Download the latest copy of the Ubuntu for Raspberry Pi from the Ubuntu web site. Burn a copy to your SSD and a Micro SD, you’ll need both for each pi device. Unfortunately, in the current state, booting to an SSD drive requires an SD card to be in the slot. Nothing new will be stored on the SD card, and you can swap them without impact to your cluster. Ideally you should be able to boot to SSD without having an SD card at all. I’m guessing this will be addressed in a future update.
Log into ubuntu and update the /boot/firmware/cmdline.txt file to include cgroup_enable=memory cgroup_memory=1 and reboot the Pi device.
Install MicroK8s
# Install MicroK8s
sudo snap install microk8s --classic

# Verify Install
snap info microk8s
microk8s.kubectl cluster-info

# Add your user to the microk8s group
sudo usermod -a -G microk8s $USER
At this point we can virtually create the cluster. Pick one of the Raspberry Pi’s to be the primary node, and run the following command to start the procedure.
# Add
sudo microk8s.add-node
This will produce an output that you need to run on the second pi device. It will look like the following:
microk8s join PI_SERVER_IP:25000/490ef0b124252fdf2c9422e4dF90fn6bThis command can only be used once per secondary node. You’ll need to run the add-node and join commands once for each secondary node, in our case we’ll do this a total of two times to create a three node cluster.
Test it out!
The cluster is setup and ready to start running containers. Try the following to confirm readiness.
microk8s.kubectl get allNext Steps
If you enjoyed this post, you may enjoy these as well.