Over-the-Air (OTA) TV antenna’s can receive 100 or more channels depending on your area. In this post I’ll cover how to integrate an OTA TV antenna into a home networking solution. I’ll show how to combine a few technical components to capture and stream the signal from television antenna. This provides the ability to view, record, and pause live OTA TV similar to the integrated DVR feature offered by cable providers.
The Raspberry Pi 5 stands out as an excellent choice for media projects like recording and streaming over-the-air TV due to its impressive balance of power efficiency and performance capabilities. Its advanced architecture ensures that it consumes significantly less power compared to traditional desktops or larger media servers, making it an eco-friendly and cost-effective solution for continuous operation. This is particularly important in a setup that requires the device to be running round-the-clock for recording and streaming purposes. Despite its low power footprint, the Raspberry Pi 5 does not compromise on performance. It is equipped with a more powerful processor and enhanced memory capabilities compared to its predecessors, ensuring smooth handling of high-definition video feeds. I had previously built this project with a Pi 4 and was disappointed with the results. The Pi 4 doesn’t have the CPU power to handle trans-coding requirements, leading to frequent multi-second buffering delays. The Pi 5 is showing better results, I’m able to record and stream simultaneously without any buffering delays. Heat can be a problem causing the device to shutdown if not managed properly. For my first attempt I had a small heat sync on the Pi 5 CPU and was able to push it beyond the limit with basic streaming and recording. Upgrading to a heat sync case provided enough cooling power to resolve the issue. My device runs in a cool environment and does not require active cooling. Results will vary for differing environments, active cooling may be required.
For this project I’m using Plex Media Server to manage the viewing / recording of video feeds. Plex excels in seamlessly categorizing media libraries, offering an intuitive way to access recorded shows and live TV. Moreover, it supports a wide range of devices, ensuring that your content is accessible from anywhere, on almost any platform. However, it’s important to note that to fully leverage Plex’s capabilities for live TV and DVR functionalities, a PlexPass subscription is required.
Parts List
(Amazon Affiliate Links Below)
- Raspberry Pi 5 (8GB)
- Raspberry Pi 5 Heat Sync Case
- Raspberry Pi USB SSD HAT
- M2 SSD Drive (512GB)
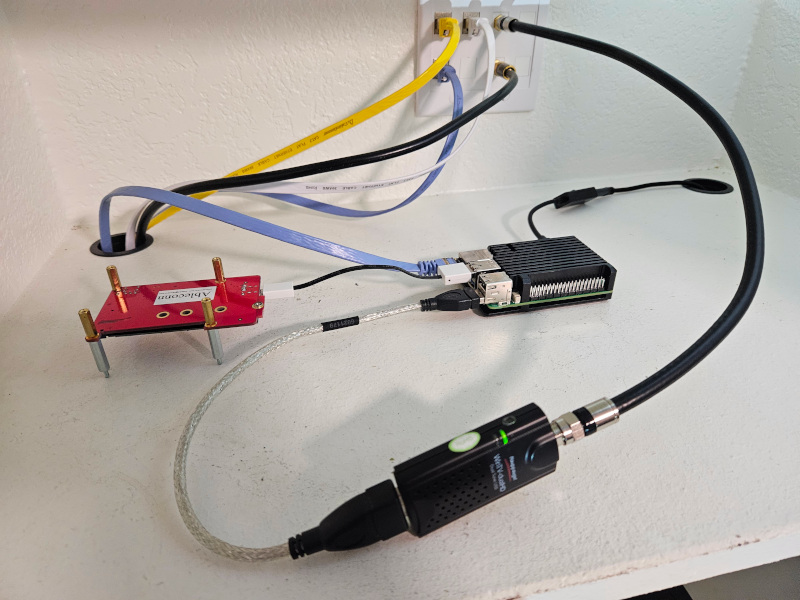
- Hauppauge WinTV-DualHD Dual USB
- ClearStream TV Antenna
- Plex Media Server Software w/ PlexPass
- Coax Cable 3 Ft
- Coax Cable 25 Ft
- Coax Cable Wall Plate
Steps
Step 1) Install the TV antenna in the desired location. In general higher is better when it comes to mounting a TV antenna. I chose a spot in the Attic for installation and the location is working very well to get a strong signal.
Step 2) Download the Raspberry OS image and write it to the SSD drive. One easy way to do this is to mount the SSD drive in the USB SSD HAT, and connect the USB HAT to your laptop/desktop. From there you can use any standard image writing software to write the Raspberry Pi OS image to the SSD.
Step 3) Connect your Raspberry Pi 5 to a monitor and keyboard for the initial boot up. This is required to create the first username and password, afterwards you can connect remotely via SSH. If you’re planning to use wifi this would be the point to setup the connection. An Ethernet connection is recommended for the best performance.
Step 4) Install the Pi 5 in it’s permanent home, connect the WinTV-DualHD to the Antenna line and the USB port on the Pi 5. Connect the SSD and boot it up.
Step 5) Connect to the SSH terminal to install OS updates and the Plex Media Software
sudo apt-get update
sudo apt-get upgrade -y
sudo apt-get install apt-transport-https
curl https://downloads.plex.tv/plex-keys/PlexSign.key | gpg --dearmor | sudo tee /usr/share/keyrings/plex-archive-keyring.gpg >/dev/null
echo deb [signed-by=/usr/share/keyrings/plex-archive-keyring.gpg] https://downloads.plex.tv/repo/deb public main | sudo tee /etc/apt/sources.list.d/plexmediaserver.list
sudo apt-get update
sudo apt install plexmediaserver -y
Step 6) Configure Plex by going to Settings > Live TV & DVR. From here you can add the TV adapter and scan for channels.
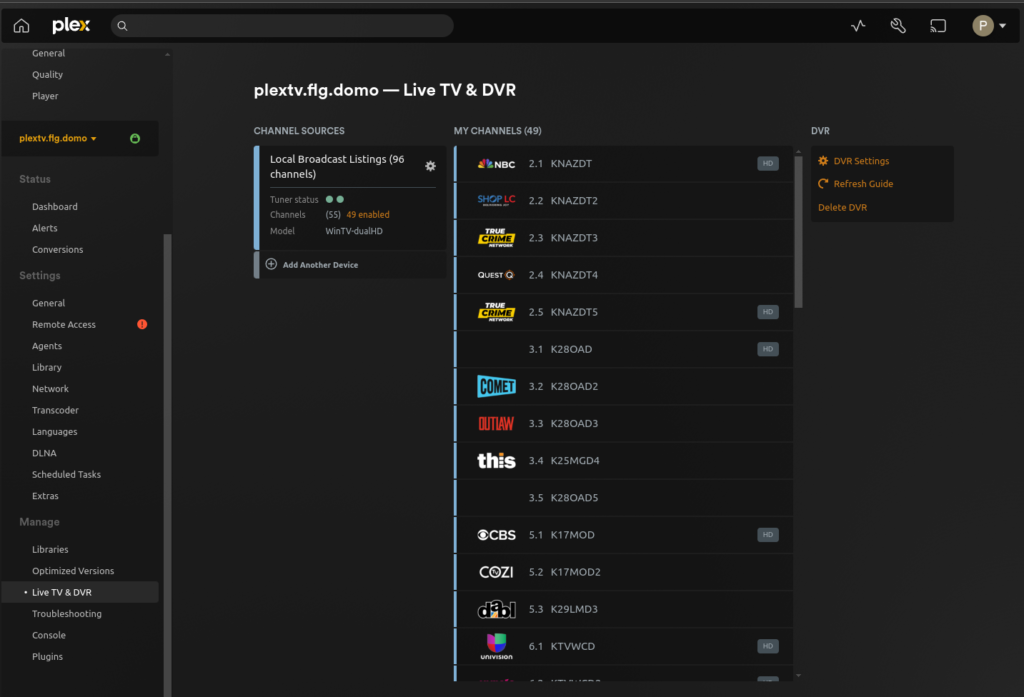
After scanning is complete Plex will download the TV schedule:
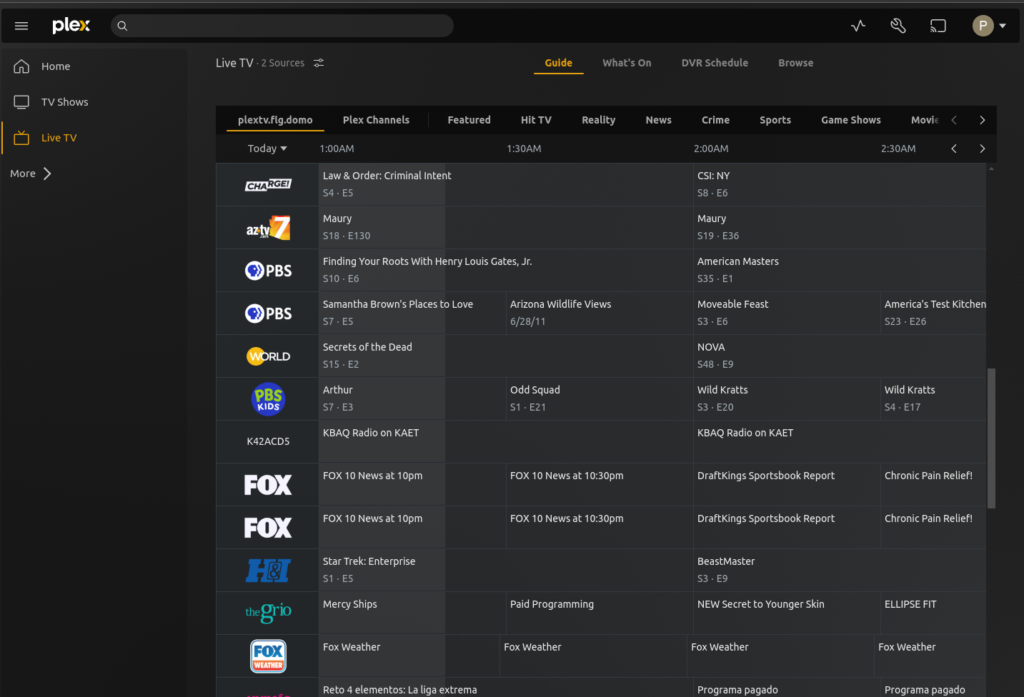
From here you can use Plex to view live TV or schedule recordings. The WinTV-DualHD device allows for recording/streaming up to 2 separate channels simultaneously.
If you enjoyed this post, you may enjoy the following as well: