In this post we’ll walk through setting up a load-balanced service using MicroK8s Kubernetes. This post assumes you already have a working MicroK8s cluster, for more information on setting up a cluster please see my post here.
The high level flow looks like this:
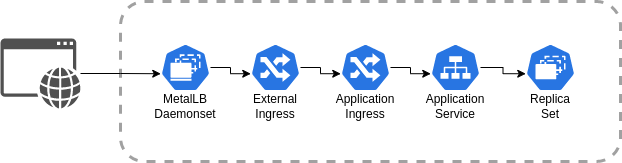
MicroK8s does not include a load balancer by default, this would normally be implemented by the cloud service provider and integrated with load balancing hardware. To add support for load balancing, we can install the MetalLB add-on as a network load balancer solution. The add-on is installed by running the following command from any of the cluster nodes. The command does not need to be run on each node, just once from any node.
microk8s enable metallbNext enable the ingress add-on. This installs the NGINX ingress controller and provides an API for creating ingress rules.
microk8s enable ingressNext we need to create the external ingress service. This will specificy the ports and IPs which will handle external traffic balancing across replica set instances. Specifying an IP is not required, but is supported and can be helpful for setting up localized DNS solutions (more on this in a future post).
apiVersion: v1
kind: Service
metadata:
  name: ingress
  namespace: ingress
spec:
  selector:
    name: nginx-ingress-microk8s
  type: LoadBalancer
  # loadBalancerIP is optional. MetalLB will automatically allocate an IP
  # from its pool if not specified. You can also specify one manually.
  # loadBalancerIP: x.y.z.a
  ports:
    - name: http
      protocol: TCP
      port: 80
      targetPort: 80
We’ll keep things simple and use the helloworld docker image to create 2 pod replicas in our deployment specification. This produces an http server that serves up “It Works!” on port 80.
apiVersion: apps/v1
kind: Deployment
metadata:
  name: helloworld-deployment
  labels:
    app: helloworld
spec:
  replicas: 2
  selector:
    matchLabels:
      app: helloworld
  template:
    metadata:
      labels:
        app: helloworld
    spec:
      containers:
        - name: helloworld
          image: httpd:2.4
          ports:
            - containerPort: 80
Next create the service, which sits between the pod instances and the ingress layer. This will allow traffic to be routed from the ingress layer to the chosen pod instance.
apiVersion: v1
kind: Service
metadata:
  name: helloworld
spec:
  type: NodePort
  selector:
    app: helloworld
  ports:
    - name: http
      protocol: TCP
      port: 80
      targetPort: 80
The last thing we need to do is setup the ingress definition for our application. Each load balancer service can support N number of application hosts. The host should reflect the name that will be accessed from the browser.
apiVersion: networking.k8s.io/v1
kind: Ingress
metadata:
  name: helloworld-ingress
  annotations:
    nginx.ingress.kubernetes.io/rewrite-target: /
spec:
  rules:
    - host: helloworld.local
      http:
        paths:
          - path: /
            pathType: Prefix
            backend:
              service:
                name: helloworld
                port:
                  number: 80
Everything should be working at this point, we can verify with the following procedure. First locate the IP of your external ingress controller:
microk8s.kubectl get svc -n ingressFind the EXTERNAL-IP next to your ingres service, it should look something like this:
NAME            TYPE          CLUSTER-IP   EXTERNAL-IP  PORT(S)
service/ingress LoadBalancer  10.15.18.19  192.168.1.4  80:30574/TCP
Now insert your external IP into the following curl command to verify the load balancer is routing traffic correctly.
curl --header "Host: helloworld.local" http://YOUR_IP_HERE/If it works you should see a curl output that looks like:
<html><body><h1>It works!</h1></body></html>Next Steps
If you enjoyed this post, you may also enjoy the next post about securing the load balancer with TLS.