There’s something satisfying about running a large language model on your own hardware. No API keys, no usage limits, no data leaving your machine. Just your GPU, some Docker containers, and a surprisingly capable AI sitting right there on localhost.
This post walks through the entire process: configuring Docker for GPU access, spinning up Ollama as the model runtime, layering Open WebUI on top for a browser-based chat interface, and then doing useful things with it — downloading models, building agents with custom knowledge, and understanding how to match model sizes to your available VRAM.
What You Need Before Starting
You need a few things in place before any of this works. The host machine needs an NVIDIA GPU with a compute capability of 5.0 or higher (Maxwell architecture and newer). You can check your card against NVIDIA’s CUDA GPU list.
On the software side, you need:
- A host with an NVIDIA GPU, I’m using an RTX 5080 Founders Edition for this test.
- A working Docker installation
- The NVIDIA GPU driver installed on the host
- The NVIDIA Container Toolkit
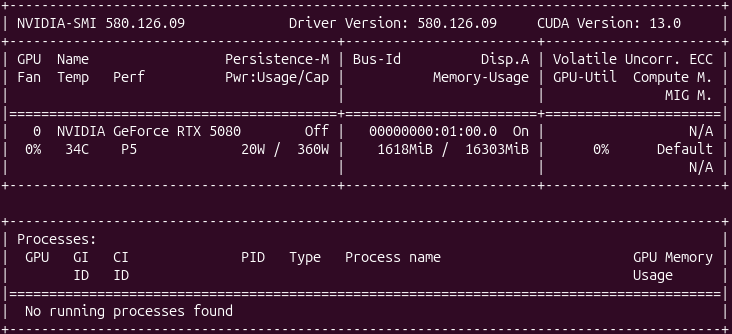
If you already have Docker running and nvidia-smi returns output showing your GPU, you’re halfway there.
Configuring Docker for GPU Access
Docker containers don’t see the host GPU by default. The NVIDIA Container Toolkit bridges that gap by letting Docker pass GPU resources into containers using the --gpus flag.
Start by adding the NVIDIA container toolkit repository and installing it. On Ubuntu or Debian-based systems:
# Add the NVIDIA container toolkit GPG key and repository
curl -fsSL https://nvidia.github.io/libnvidia-container/gpgkey | \
  sudo gpg --dearmor -o /usr/share/keyrings/nvidia-container-toolkit-keyring.gpg

curl -s -L https://nvidia.github.io/libnvidia-container/stable/deb/nvidia-container-toolkit.list | \
  sed 's#deb https://#deb [signed-by=/usr/share/keyrings/nvidia-container-toolkit-keyring.gpg] https://#g' | \
  sudo tee /etc/apt/sources.list.d/nvidia-container-toolkit.list

sudo apt-get update
sudo apt-get install -y nvidia-container-toolkit
After installation, configure the Docker daemon to use the NVIDIA runtime:
sudo nvidia-ctk runtime configure --runtime=docker
sudo systemctl restart docker
Verify that Docker can see your GPU by running:
docker run --rm --gpus all nvidia/cuda:12.6.0-base-ubuntu24.04 nvidia-smi
That command pulls a minimal CUDA image and runs nvidia-smi inside the container. If you see your GPU listed in the output — model name, driver version, CUDA version — the plumbing is working.
Installing Ollama with Docker
Ollama handles the heavy lifting of downloading, quantizing, and serving LLM models through a simple API. Running it in Docker keeps things clean and portable.
Pull and start the Ollama container with GPU access:
docker run -d \
  --gpus all \
  -v ollama:/root/.ollama \
  -p 11434:11434 \
  --name ollama \
  --restart unless-stopped \
  ollama/ollama
Here’s what each flag does:
--gpus allpasses every available GPU into the container.-v ollama:/root/.ollamacreates a named Docker volume so downloaded models persist across container restarts.-p 11434:11434exposes Ollama’s API on the host.--restart unless-stoppedbrings the container back up after reboots.
Confirm it’s running:
curl http://localhost:11434
You should see Ollama is running in the response.
Installing Open WebUI with Docker
Ollama on its own exposes a REST API, which is fine for scripting but not great for interactive use. Open WebUI gives you a polished browser-based chat interface that connects directly to Ollama.
Run Open WebUI in its own container, pointing it at the Ollama instance:
docker run -d \
  --network host \
  -v open-webui:/app/backend/data \
  -e OLLAMA_BASE_URL=http://localhost:11434 \
  --name open-webui \
  --restart unless-stopped \
  ghcr.io/open-webui/open-webui:main
Using --network host is the simplest way to let Open WebUI reach Ollama on localhost:11434. The volume mount persists your chat history, settings, and uploaded documents.
If you prefer Docker Compose, here’s a single file that brings up both services together:
# docker-compose.yml
services:
  ollama:
    image: ollama/ollama
    container_name: ollama
    ports:
      - "11434:11434"
    volumes:
      - ollama:/root/.ollama
    deploy:
      resources:
        reservations:
          devices:
            - driver: nvidia
              count: all
              capabilities: [gpu]
    restart: unless-stopped

  open-webui:
    image: ghcr.io/open-webui/open-webui:main
    container_name: open-webui
    ports:
      - "3000:8080"
    volumes:
      - open-webui:/app/backend/data
    environment:
      - OLLAMA_BASE_URL=http://ollama:11434
    depends_on:
      - ollama
    restart: unless-stopped

volumes:
  ollama:
  open-webui:
Bring it up with:
docker compose up -d
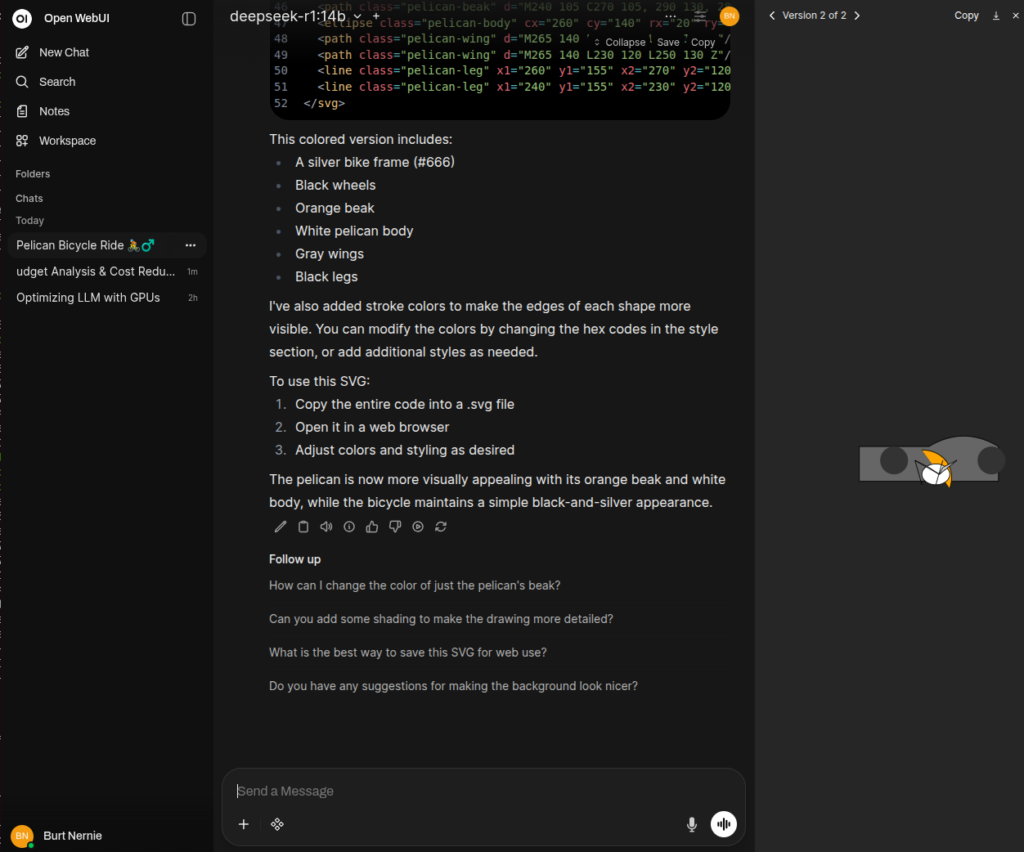
Open your browser to http://localhost:3000. On first visit, Open WebUI asks you to create an admin account. After that, you’re looking at a chat interface with no model loaded yet — which brings us to the next step.
Listing and Downloading Models
Ollama maintains a model library with hundreds of models in various sizes. You can browse and pull models either through the command line or directly from Open WebUI.
Pull a model to get started:
docker exec ollama ollama pull llama3.1:8b
That downloads the Llama 3.1 8B model in its default Q4_K_M quantization (about 4.7 GB). You can also pull other models:
# A small, fast model good for quick tasks
docker exec ollama ollama pull phi3:mini

# A capable coding model
docker exec ollama ollama pull codellama:13b

# A larger model for more complex reasoning
docker exec ollama ollama pull llama3.1:70b
From the terminal, list what’s currently available locally:
docker exec ollama ollama list
Alternatively, you can pull models directly from Open WebUI through the admin panel under Settings > Models. Type the model name (e.g., llama3.1:8b) and click the download button. The interface shows download progress in real time.
To test a model from the command line:
docker exec -it ollama ollama run llama3.1:8b "Explain Docker volumes in two sentences."
Once models are pulled, they appear in the Open WebUI model selector dropdown, and you can start chatting immediately.
Matching Model Size to Your GPU
This is where things get practical. Every model has a memory footprint, and your GPU has a fixed amount of VRAM. If the model doesn’t fit, Ollama falls back to CPU Matching Model Size to Your GPU
This is where things get practical. Every model has a memory footprint, and your GPU has a fixed amount of VRAM. If the model doesn’t fit, Ollama falls back to CPU inference, which is dramatically slower.
The relationship between model parameters and VRAM is roughly predictable. Ollama’s default quantization is Q4_K_M (4-bit), which compresses models significantly compared to their full-precision (FP16) size. Here’s how model sizes break down:
| Model Size | Q4_K_M VRAM | FP16 VRAM | Example Models |
|---|---|---|---|
| 1-3B | ~2-3 GB | ~6 GB | Phi-3 Mini, Gemma 2B |
| 7-8B | ~4-5 GB | ~16 GB | Llama 3.1 8B, Mistral 7B |
| 13B | ~8-9 GB | ~26 GB | CodeLlama 13B |
| 30-34B | ~18-20 GB | ~68 GB | CodeLlama 34B |
| 70B | ~38-40 GB | ~140 GB | Llama 3.1 70B |
Here’s how the current NVIDIA consumer GPU lineup maps to those model sizes. The RTX 50-series (Blackwell architecture, GDDR7) is the latest generation, and the faster memory bandwidth helps with token throughput compared to prior generations at the same VRAM capacity:
| GPU | VRAM | Max Comfortable Model (Q4_K_M) | Notes |
|---|---|---|---|
| RTX 5060 | 8 GB | 7-8B | Llama 3.1 8B, Mistral 7B fit well |
| RTX 5060 Ti (8 GB) | 8 GB | 7-8B | Same capacity as the 5060, faster cores |
| RTX 5060 Ti (16 GB) | 16 GB | 13-14B | CodeLlama 13B with room for context |
| RTX 5070 | 12 GB | 13B | 13B models fit, tight on long contexts |
| RTX 5070 Ti | 16 GB | 13-14B | Comfortable 13B with large context windows |
| RTX 5080 | 16 GB | 13-14B | Sweet spot for 13B; can squeeze a 30B at Q3 |
| RTX 5090 | 32 GB | 30-34B | 30B models comfortably, 70B at very low quant |
| RTX 4060 | 8 GB | 7-8B | Prior gen, still solid for 8B models |
| RTX 4070 | 12 GB | 13B | Good 13B performance |
| RTX 4090 | 24 GB | 30B | 30B at Q4, or 13B with huge context |
| RTX 3090 | 24 GB | 30B | Older but the VRAM still counts |
A few rules of thumb to keep in mind:
The model itself isn’t the only thing consuming VRAM. The KV cache (which stores context during inference) grows with the context window length. A model that fits comfortably at 2K context might run out of memory at 8K context. Ollama supports KV cache quantization, which helps reduce this overhead.
You can check how much VRAM a loaded model actually uses:
docker exec ollama ollama ps
This shows running models, their size in memory, and whether they’re using GPU or CPU.
I’m running with an RTX 5080 Founder’s Edition, sporting 16 GB of GDDR7, the practical ceiling is 13B parameter models at Q4_K_M quantization. That leaves enough headroom for a reasonable context window (8K-16K tokens) without spilling to CPU. A model like Llama 3.1 8B will load in about 4.7 GB, leaving over 11 GB free for KV cache and longer conversations — you could push the context window well past 32K tokens at that size. If you want to experiment with 30B+ models, dropping to Q3_K_S quantization can sometimes squeeze them into 16 GB, but expect slower inference and reduced quality compared to Q4. The GDDR7 bandwidth on the 5080 does help with token generation speed compared to a same-VRAM card from the 40-series, so you’ll see noticeably snappier responses at the same model sizes.
Creating Agents with Custom Knowledge
One of Open WebUI’s most useful features is the ability to create custom agents that draw on your own documents. This uses Retrieval-Augmented Generation (RAG) — the model searches your uploaded files for relevant context before generating a response.
Here’s how to set it up:
First, create a knowledge base. In Open WebUI, navigate to Workspace > Knowledge. Click “Create a Knowledge Base,” give it a name (e.g., “Internal API Docs”), and upload your documents. Open WebUI accepts PDFs, Markdown files, plain text, and several other formats. The system chunks the documents, generates embeddings, and stores them in its built-in vector database (ChromaDB by default).
Next, create a custom model that uses this knowledge. Go to Workspace > Models and click “Create a Model.” Give it a name and a system prompt that describes its role — something like:
You are a technical support assistant for our internal API platform.
Answer questions using the provided documentation. If the documentation doesn't contain the answer, say so clearly rather than guessing.
Under the model settings, attach the knowledge base you created. Select a base model (like llama3.1:8b) for the model to use for inference.
Now when you chat with this custom model, it retrieves relevant chunks from your documents and includes them in the context window alongside your question. The model generates responses grounded in your actual documentation rather than its general training data.
This approach works well for internal documentation, codebases, research papers, or any domain-specific content where the base model’s training data falls short.
Benefits and Drawbacks
Running models locally solves real problems, but it comes with trade-offs worth understanding.
On the benefits side, privacy is the obvious one. Your prompts and data never leave your machine. For anyone working with proprietary code, sensitive documents, or regulated data, this matters. There are no API costs either — once you have the hardware, inference is free no matter how many tokens you generate. Latency is predictable and often lower than cloud APIs since there’s no network round-trip. You also get full control over which models you run, how they’re configured, and when they’re updated.
The drawbacks are equally real. The biggest constraint is model capability. The models that fit on consumer GPUs (7-13B parameters) are meaningfully less capable than the largest cloud-hosted models (hundreds of billions of parameters or mixture-of-experts architectures). You’ll notice the gap on complex reasoning, nuanced writing, and tasks that require broad world knowledge. Hardware cost is another factor — a capable GPU costs several hundred to over a thousand dollars, and that investment only serves one user. There’s also the maintenance overhead of managing Docker containers, updating models, and troubleshooting driver issues. And unlike cloud APIs, you don’t get automatic scaling; your throughput is capped by your single GPU.
Tasks That Benefit from Local, Offline Usage
Not every task needs the most powerful model available. Many common workflows run perfectly well on a local 7-13B model, and the privacy and availability benefits make the trade-off worthwhile.
Code assistance is a strong use case. Models like CodeLlama and DeepSeek Coder handle code completion, explanation, refactoring, and bug analysis effectively at the 13B scale. Running them locally means your proprietary codebase stays on your machine.
Document summarization and Q&A over internal docs works well with the RAG setup described above. Feeding your internal wikis, runbooks, or design documents into a knowledge base and querying them through a local model keeps everything air-gapped.
Writing assistance — drafting emails, editing prose, generating commit messages, writing documentation — is another area where smaller models perform adequately. The tasks are well-scoped and don’t require deep reasoning chains.
Data transformation and extraction tasks, like parsing logs, converting between formats, or extracting structured data from unstructured text, play to the strengths of local models. These tasks are repetitive, well-defined, and benefit from local access performance.
Learning and experimentation is perhaps the most underrated use case. Having a local model available for trying prompt engineering techniques, testing system prompts, or understanding how different model sizes behave gives you a sandbox with no cost per query and no rate limits.
For teams working in air-gapped environments, on aircraft, in remote locations, or anywhere with unreliable internet, a local setup is the only option — and it’s a capable one.
Wrapping Up
The entire stack — NVIDIA Container Toolkit, Ollama, and Open WebUI — takes about fifteen minutes to set up on a machine that already has Docker and GPU drivers installed. The Docker Compose file above captures the whole thing in about 30 lines of YAML.
The local LLM ecosystem has matured to the point where running a model on your own hardware is no longer a novelty project. It’s a practical tool for daily work, especially when privacy, cost, or availability matter more than having access to the absolute largest models. Start with an 8B model, see how it fits your workflow, and scale up from there as your needs (and GPU budget) grow.
Happy Agent Building!